If you’re a developer looking to install Apache Maven on Windows, you’re in the right place. Apache Maven is a powerful project management tool that helps manage your build lifecycle. In this guide, we’ll walk you through each step to ensure you successfully install Apache Maven on your Windows machine and start using it with ease.
Step 1: Verify JDK Installation Before Installing Apache Maven
Before you proceed with installing Maven, you need to have the Java Development Kit (JDK) installed. Maven requires JDK to work properly, so the first step is to check if it’s already installed.
- Open the Command Prompt and run the following command:
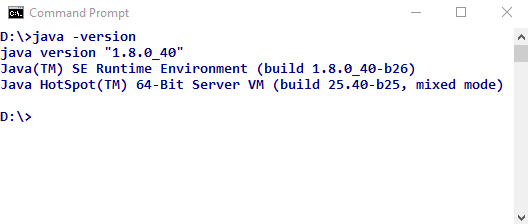
2. If you see the Java version, you’re good to go. If not, you’ll need to download and install JDK. Don’t forget to set the JAVA_HOME environment variable, pointing to your JDK installation directory.
- To set
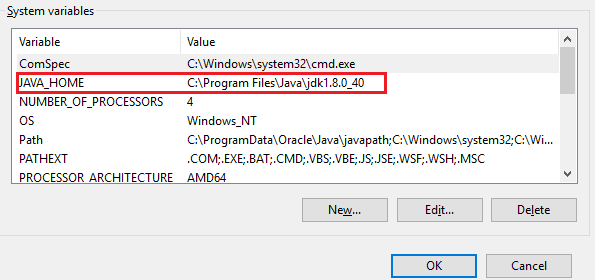
JAVA_HOME, follow these steps:- Go to My Computer > Properties > Advanced System Settings > Environment Variables.
- Add a new system variable called
JAVA_HOME, and set the path to the JDK installation directory.
Note-Maven 3.3+ requires JDK 1.7 or higher.
Step 2: Download and Install Apache Maven on Windows
To install Apache Maven on Windows, download the latest Maven zip file from the official website: Download Apache Maven
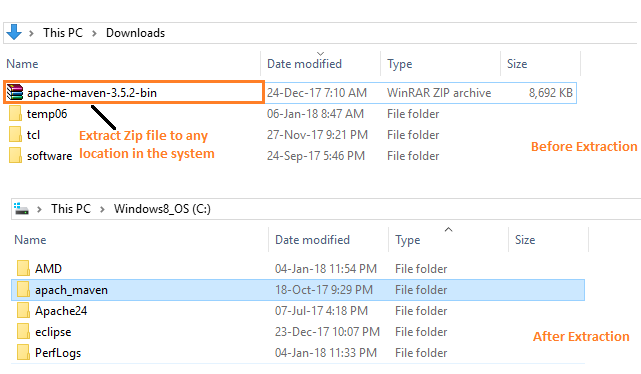
- Extract the zip file to a location on your computer, such as
C:\apache_maven\bin. - Remember the directory where you extract Maven, as you’ll need it for the next steps.
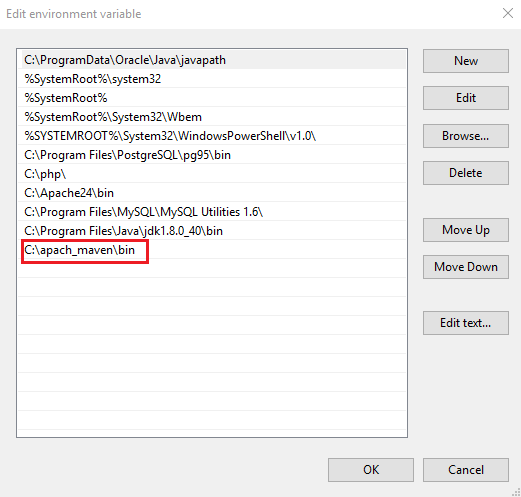
Step 3: Add Maven to System Path for Easy Access
Once you’ve downloaded and extracted Maven, the next step to install Apache Maven on Windows is to add it to the system’s PATH variable. This ensures you can run Maven commands from any directory in the Command Prompt.
- Go to My Computer > Properties > Advanced System Settings > Environment Variables.
- Under “System Variables,” find the
Pathvariable, then click Edit. - Add the Maven
bindirectory path to the end of the variable value (C:\apach_maven\bin). - Click OK to save the changes.
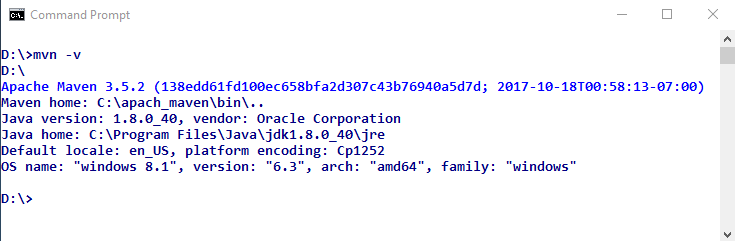
Step 4: Verify the Installation of Apache Maven
To verify that you have successfully installed Apache Maven on Windows, run the following command in the Command Prompt. If the installation is successful, you’ll see Maven’s version, Java version, and operating system details. For example:
Conclusion: Enjoy Using Apache Maven on Windows
By following these simple steps, you can easily install Apache Maven on Windows and start managing your projects effectively. If you encounter any issues during installation, double-check your environment variables, especially JAVA_HOME and Maven’s bin directory.
Happy Learning!!